
You will need:
-Wooden doll head (the kind with the flattened bottom). I used one with a diameter of about 2.5 inches, but you can scale up or down as you like.
-Felt of fleece for the body plus scraps for clothes, tummies, etc
-Acrylic paint
-Paintbrush
-Fine tip permaneant marker
-Fabric marking tool
-Stuffing
-Matching thread
-Sharp scissors
-Hot glue gun
-Sandpaper
-Ribbon or small scale trim
-2 pipe cleaners
-Other bits for decoration (beads, ribbon roses, etc)
Steps:
1. Lightly sand the wooden dolls head and wipe clean with a slightly damp cloth. Paint. If your piece has a hole in the bottom, stick a chopstick in there so you don't get paint on your fingers. Set aside to dry.
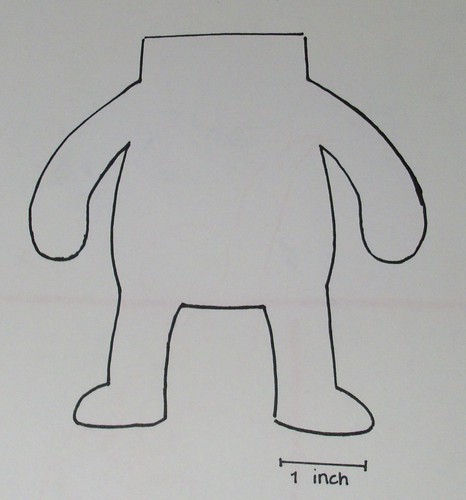
2. Print out the pattern on cardstock and cut out. (Scale as you need to using the 1 inch mark at the bottom.) Layer two pieces of felt or fleece and trace the pattern. Pin and sew directly on the line.
3. Trim away the extra fabric, leaving a small seam allowance. You can either turn the body right side out or leave the seam allowance on the outside. (If you leave it on the outside make sure to trace with something that will either disappear or that can be removed, like an air soluable makrer.)
4. If you want you can use pipecleaners to make the toy posable. Use one for both legs and one for both arms, bending as needed and folding each end over several times to make a bit of a lump for each hand and foot. Put the pipecleaner in the legs and stuff firmly, moving on to the body. I found that using a pencil or paintbrush handle helps. Put the pipecleaner in the arms and stuff these firmly as well, continuing up to the neck. With a needle and thread, sew a running stitch around the neck opening. Pull tight and secure.
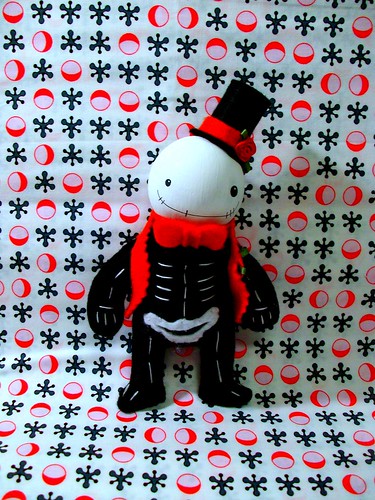
5. Make sure the head is dry before attaching. Put a good amount of hot glue on the flat part and squish it straight down onto the neck. Hold in place for a minute or two to let the glue set a bit.
6. Use markers and more paint to add facial features. You can also glue on bits of felt or yarn to make ears, hair, etc.
7. Glue some trim around the neck to hide the seam. Add clothing, embroidery, or other trims.
Other Stuff:
Skeleton Gent's hat is made from a long strip of felt rolled tightly and secured and then glued on to a felt circle and trimmed. You can make a little bowler hat in a similiar way by cutting a circle and gathering it (like a fabric yo yo). Stuff it before pulling tight and securing it and glue to a felt circle for a brim.
No comments:
Post a Comment