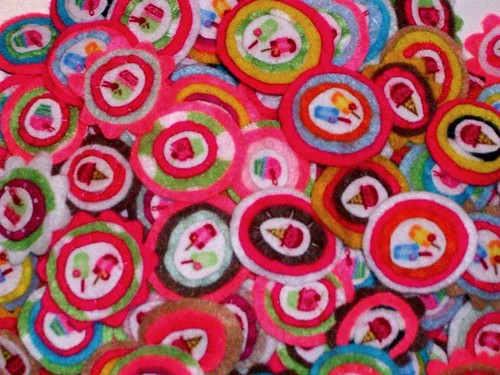
 Why did I make this many buttons? I have 104 of them. Eek!
Monday, July 28, 2008
Sunday, July 20, 2008
Pendants
Evers since I saw this great post about deconstructing a placemat I've been on the lookout for one. I finally got lucky at Ross the other day and found a great one for only $2.50!
I was playing around with different things on them. We had some Nashua tape from fixing our air conditioner and I found out this works pretty well to make embossed metal pieces. I just cut a piece of tape and drew on it with a fine tip Sharpie to get thin, colored lines. I tried a sharp pencil for just plain lines and that seemed to work out fine. Then I just cut the size I needed and stuck it on the bead.

I was playing around with different things on them. We had some Nashua tape from fixing our air conditioner and I found out this works pretty well to make embossed metal pieces. I just cut a piece of tape and drew on it with a fine tip Sharpie to get thin, colored lines. I tried a sharp pencil for just plain lines and that seemed to work out fine. Then I just cut the size I needed and stuck it on the bead.
Friday, July 18, 2008

Tuesday, July 15, 2008
Pizza Plant (with tutorial)

This is my first tutorial and it's kind of long, so bear with me. I used the pre-cut pieces of acrylic felt as that was what I had on hand, but you can use wool felt or fleece, anything that has some thickness and doesn't fray.
You need:
1 or 2 pieces of beige felt
1 piece of red felt
1 piece of dark brown felt
1 piece of white felt
2 or 3 pieces of green felt (more depending on how many leaves and flower stems you want)
Felt scraps for toppings
Felt scraps for toppings
Tacky glue or hot glue
Needle and thread (green and beige)
Pencils or dowel bits for stems
A bit of fiberfil (maybe a loose handful per flower)
Something to plant it in (I used a tin can, but you can use anything you have handy)
Something circular you can trace (a cup, a can etc)
Fabric marking pen (preferably air soluable)
Sharp scissors
Wire (beading wire or similiar)
Thin cardboard (you can use an empty cereal box)
1. Begin by making your pizza bits. Fold your beige felt in half (good sides together if the sides are different). Trace around something round (I used a plastic cup). Make as many circles as you want flowers and make in various sizes.
2. Either hand sew or machine stitch along the line you drew. Sew slowly so you can get a nice curve. Make sure to leave a gap so you can turn it right side out.
3. Cut your circles out about 1/8" from stitching line. Turn right side out. Sew another line about 1/2" in from the edge. Do not leave a gap in this line, sew all the way around.
 4. Stuff the channel you just made. This will be the raised part of the crust. Only use teeny amounts of stuffing at a time and use a pencil or chopstick to help. When it's all stuffed, handsew the opening shut with a whipstitch (the kind that goes diagonally over the edge of the fabric).
5. Cut a piece of red felt to fit in the flat middle part of your pizza crust. Glue in place. Cut a slightly smaller irregular circle of white felt for your cheese. Glue this in place too.
6. Cut toppings from your scraps. I made a green pepper, olive, and mushroom pizza. Glue these in place however you like.
Ta-da!, your pizza flowers are all done! Now time to make some buds to fill out the plant...
1. Cut out some smaller circles from your left over beige and red felt. Cut as many circles as you want buds.

2. Cut a slice from each circle, maybe a sixth of the circle. Cut slightly more from the red than the beige.
3. You can make a tightly closed bud by rolling and gluing the red piece. Make sure it flairs out a bit at the end, but is tight at the point. Wrap and glue the beige piece over it.
4. To make a more open bud, cut some stips of white felt about 3" long. Stack two of them together and take a stitch through the middle of the strip. Sew this to the center of your red piece. This will give you little cheese "stamens". You can add some longer, thinner toppings too if you like (slices of green pepper, etc). Then make them the same as the tight bud, just don't roll as tightly.

Leaf time!
1. Cut a simple leaf shape from your cardboard to make a template.
2. Stack two piece of green felt together and trace your template as many times as you can. Also draw a line up the center of each leaf.
3. Starting near your center line, sew up along the center of the leaf. You can pivot and sew towards the edge and then back to make little veins. Once you get close to the top of the leaf, pivot and sew back down the middle of the leaf, slightly over from your first line of stitching (maybe 1/4"). This will create a channel along the center of the leaf, about 1/4" wide. Use the picture to kind of give you a better idea of what to do. The arrow indicates the opening of the channel.

4. When you get to the base of the leaf again, sew around the edge of the leaf and back to where you started. Make sure you do NOT sew over the opening to the channel.
5. Cut each leaf out close to the sewing line.
6. Cut a piece of wire about 3 times the length or your leaf. Fold it in half and feed it into the channel. This makes it so you can pose your leaves.
7. Repeat for as many leaves as you want, making them various sizes. Also cut out several small leaves from a single layer of felt (maybe 1 1/2" to 2" in length).
Now let's put it together!
1. Make your stems by first cutting a strip of felt wide enough to wrap around your pencil with some overlap and and a little longer than the pencil. You can cut the pencil down for shorter stems. Wrap the felt around and glue or whipstitch in place.
2. Snip into the extra felt to make several tabs at the top of the stem. Spread these out and glue to the back of your pizza flower.
3. Cut an irregular circle that is about an inch smaller than your pizza flower. Cut a slit into it that extends a little bit past the center. Make some little clips from the center. (Check out the picture.)
Slip this around your stem to cover your tabs and add stability. Glue in place.

4. Wrap one of the little leaves you cut around the bottom of your pizza buds and glue in place. Trim away the extra and stitch or glue to your stem in little clusters. Glue on a few extra leaves. Make sure not to do it too close to the base so you'll be able to see them all.
5. Once you have all your pizza flowers ready, cut a piece of dark brown felt to line what you're planting them in. Trace the opening of your "planter" and cut out this piece. Cut slits where you want the plants to be and slide them in. Use your scraps from this project to stuff around the stems to give them some stability and slide them in. Glue leaves around the edge and bend them until you're happy with how they look.
All done! Sit your plant somewhere sunny and remember not to litter!
Monday, July 14, 2008
Zesty!
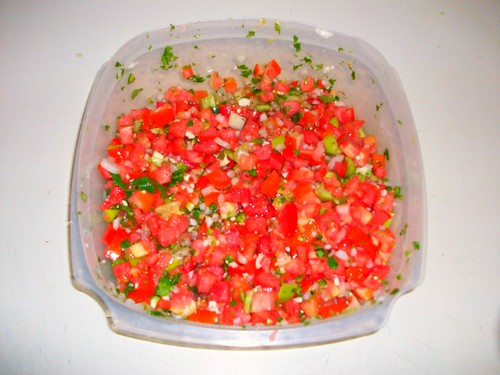
I made a big batch of homemade salsa today. Three hothouse tomatoes, four Roma tomatoes, an Anaheim chili, two jalapenos, half an onion, a bulb of garlic, two tomatillos, and of course cilantro and lemon and salt. Spicy and delicious!
I also went to see Wall-e. Pixar is totally lovely. I am incredibly tempted to make a pizza plant, which I may very well do with a little help from my new book.
Friday, July 11, 2008
Aprons on Etsy
I've added six aprons to my Etsy.

I really love making these. The fabric really inspired the project in this case, as soon as I saw this "apron" popped into my head. They're also not terribly complicated and it gives me a chance to mix a lot of patterns, which is one of my favorite things to do. Each one has at least four different fabrics, some have five.

I really love making these. The fabric really inspired the project in this case, as soon as I saw this "apron" popped into my head. They're also not terribly complicated and it gives me a chance to mix a lot of patterns, which is one of my favorite things to do. Each one has at least four different fabrics, some have five.
Thursday, July 10, 2008
I'm A Blogger
I've been reading all these great craft blogs, getting ideas and inspirations. So I've finally decided to join the world of blogging. Hopefully I can keep it up...
Subscribe to:
Posts (Atom)