Thursday, January 22, 2009

Birds and Evil Plots (Days 3 and 4)


So it seems blogging every day isn't working super well, but I'll take every other day over every other month. Oh well.

Work took up most of the last two days, so not much to report. I've continued working on my birdy bags, and then got distracted making plans. Bats insists on making me sit and watch things like 24 for hours on end. While this is an entirely acceptable way for him to spend the evening, I absolutely can not abide just sitting and watching television unless I'm sick or half asleep. Thus I'm making plans for a series of embroidery projects, as it's something small and portable enough that I can do it while sitting on the sofa. (The sewing machine is a little bulky and noisy unfourtunetly.)

And to make up for my lack of any real content, here's some links!
Lovely bird mobile
Sweet little coasters
Recycled plastic bag bows
How to reverse applique
Ric rac dahlias(Which I have made and totally love)

I'll also be posting the pattern and instructions for my dolls this week, so keep an eye out for that.

Tuesday, January 20, 2009

Aren't You Tweet (2 and 3)

So I'm going to try this Craft 365 thing. I'm counting Sunday's post as 1, sort of cheating but oh well. I'm pretty good about crafting everyday. Sewing is my therapy and after a day of retail I need some therapy. What I'm hoping this will improve is my dedication to blogging. I am terrible about blogging. I hate to take pictures, I don't like editing pictures, and I never really know what to say on this thing. But I feel like it's important for me to put my projects out there and maybe even inspire other people like I've been inspired by other blogs.

On that note, here's what I've been up to for the last two days. I have a picture of the plotting on my Flickr.

I started out by finding pictures of birds that I liked online and traced the shape onto paper with marker. Most of them had to be simplified so I wouldn't have a million little pieces. Then I traced the shapes onto some paper backed fusible webbing. I made it with a little overlap, but trimmed where I could so I wouldn't have too many layers.

Then I cut out the pieces, ironed them on, and stitched around the edge just for added durability.

I still have a bunch more to do, I think I made 11 or 12 designs all together. (There are more finished ones on my Flickr.) The outsides have been cut out and the birdies ironed on and the contrast fabrics are selected, so just a lot of sewing to do.

In other news, I was blogged on Craftzine (my second time). So exciting!

Monday, January 19, 2009

You're a Dollface

I started these waaaaaay back in October, dolls of Bats and I. Between lots of more pressing projects they got sort of pushed aside, languishing in their undies. But I finally got around to making them decent.


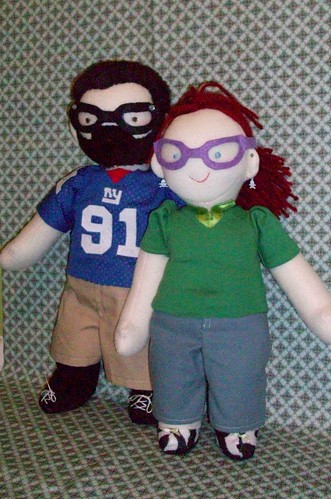
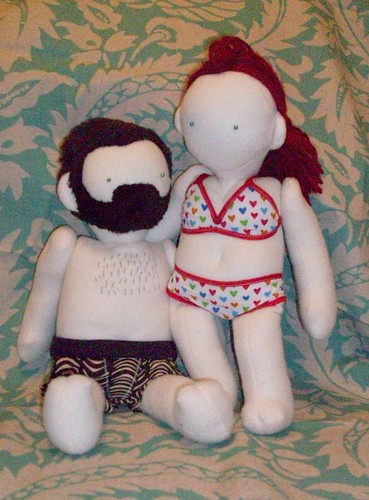
I'm so happy with the way they turned out (excuse the picture, the lighting was terrible but I was too excited to wait). Here is a picture of us for reference. Bats is about 19" tall and I'm about 17". I used lovely soft fleece and stuffed them loosely, so they're kind of floppy and nice to cuddle. The arms are jointed and the legs are made so they can sit nicely. Bats has a wee little jersey of course, with numbers made from felt and attached with fusible webbing (I was worried glue would go through the mesh). He also has a little sweatshirt made from an actual sweatshirt that was ruined. His socks are made from the finger parts of a pair of mittens, although I need to find some white ones to get the proper color. We each have little felt shoes.


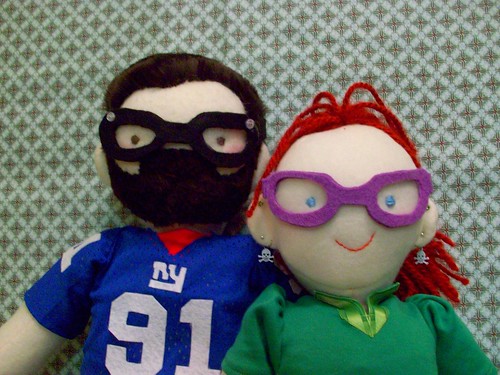
Our little glasses even have lenses of clear plastic. I need to figure out how to attach the glasses, I want them to be able to come off, and right now they're just pinned onto our heads. Any ideas?
I like the simple embroidered faces, they don't compete with the other things going on. Doll faces are always so hard to figure out, since they contribute so much to the personality of the doll. Realistic eyes or felt or embroidered? Nose or not? We do both have mouths, his is just a bit hard to see with the beard. Bats has the absolute softest hair too, cut from a big piece of fake fur I found at the thrift store ages ago.

I wanted these to be able to take along when I go to visit my family. All my family and friends are on the other side of the country, which means when I go see them I'm gone for about a week. Which leads to much pining for my favorite superhero, and some limited pining on his part I imagine. I've been taking my Ninja Ice Bat, which Bats got me on our first date, but it's not quite the same. (He thinks I ought to get a little recordable voice box for the doll of me so he can have a doll that talks all the time for the true expeirence, the jerk.)

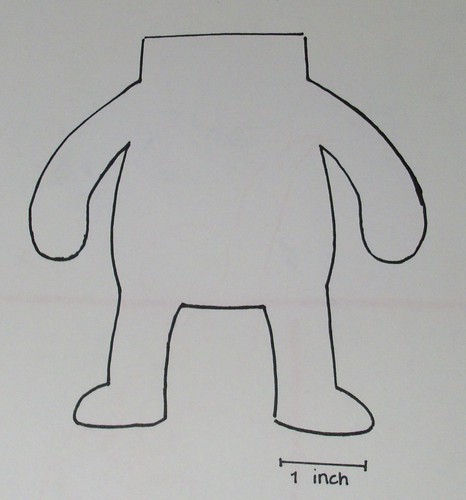
I was actually good with these and did my best not to fudge the pattern as a I went along. I'll be posting the pattern with instructions for a limited time, as I'd like to sell it eventually and would love some feedback. Please let me know if you're interested.

Sunday, January 11, 2009

Fabric Pouches

I think I made a post about these way back in October of last year and I neglected to ever post pictures! I intended to sell them at Craft Attack, but they didn't move very well. (Although I did get rid of one in trade.) Each one measures about 5" by 7" (9" by 7" when opened). They are lined with a contrasting fabric. Matching the fabrics and finding buttons to go was totally my favorite part.


I am absolutely in love with the birdy fabric on the fourth pouch. The pattern runs along the bias, which I adsolutely adore, and the birdies are so wee and lovely. It got lined with a red and white polka dot.


The first pouch was part of a fat quarter trade, an adorable floral. The fourth pouch is a vintage pillowcase from Goodwill and the fifth is from a set of napkins that were on sale at Walmart. I'm considering making a little curtain for the kitchen window from the fabric on the last pouch.


The black and white one is lined with a teeny dancing skeleton print, I think it's one of my favorites of the batch.


The fourth one is made from a towel from the dollar store. I think it was there because the little jars on it say "sill" rather than "dill", but I loved the colors and the absolutely horrified expression on the little fishes.

Tuesday, January 6, 2009

Another Tutorial

Wow, I am terrible at updating. (I think I smell a resolution.) To make up for it, here's a tutorial!


You will need:
-Wooden doll head (the kind with the flattened bottom). I used one with a diameter of about 2.5 inches, but you can scale up or down as you like.
-Felt of fleece for the body plus scraps for clothes, tummies, etc
-Acrylic paint
-Paintbrush
-Fine tip permaneant marker
-Fabric marking tool
-Stuffing
-Matching thread
-Sharp scissors
-Hot glue gun
-Sandpaper
-Ribbon or small scale trim
-2 pipe cleaners
-Other bits for decoration (beads, ribbon roses, etc)

Steps:
1. Lightly sand the wooden dolls head and wipe clean with a slightly damp cloth. Paint. If your piece has a hole in the bottom, stick a chopstick in there so you don't get paint on your fingers. Set aside to dry.
2. Print out the pattern on cardstock and cut out. (Scale as you need to using the 1 inch mark at the bottom.) Layer two pieces of felt or fleece and trace the pattern. Pin and sew directly on the line.
3. Trim away the extra fabric, leaving a small seam allowance. You can either turn the body right side out or leave the seam allowance on the outside. (If you leave it on the outside make sure to trace with something that will either disappear or that can be removed, like an air soluable makrer.)
4. If you want you can use pipecleaners to make the toy posable. Use one for both legs and one for both arms, bending as needed and folding each end over several times to make a bit of a lump for each hand and foot. Put the pipecleaner in the legs and stuff firmly, moving on to the body. I found that using a pencil or paintbrush handle helps. Put the pipecleaner in the arms and stuff these firmly as well, continuing up to the neck. With a needle and thread, sew a running stitch around the neck opening. Pull tight and secure.
5. Make sure the head is dry before attaching. Put a good amount of hot glue on the flat part and squish it straight down onto the neck. Hold in place for a minute or two to let the glue set a bit.
6. Use markers and more paint to add facial features. You can also glue on bits of felt or yarn to make ears, hair, etc.
7. Glue some trim around the neck to hide the seam. Add clothing, embroidery, or other trims.

Other Stuff:
Skeleton Gent's hat is made from a long strip of felt rolled tightly and secured and then glued on to a felt circle and trimmed. You can make a little bowler hat in a similiar way by cutting a circle and gathering it (like a fabric yo yo). Stuff it before pulling tight and securing it and glue to a felt circle for a brim.