Saturday, September 17, 2011

Nifty Thrifty - Creature from the Year Thrift-Thousand

This week's Nifty Thrifty is a little about the view on the way to the thrift store rather than the thrift store itself.

If I can manage to sneak out of work a little early on Fridays, I take a little stroll to the bus stop and head to the thrift store. I work in a fairly industrialized area, but it still makes for a really nice walk after sitting in an office all day. It was so nice this past Friday that I decided to take a few photos on the way.


There are two wooden posts on either side of driveway on the way. One is just a normal, weathered wooden post. The other one is this:


Post Guy looks a little quizzical. Perhaps he's curious about why has such a severe flat top.


Once I get to the bus stop, there are several trees to wait under.


The bus stop takes me to the light rail station and then to the thrift store. The stations were I live are each decorated in a different theme. The two I see on the way to the thrift store are not two of my favorites, but I do like one thing. The elevator at one is decorated with a mosaic of reflectors. I love the idea of using not artistic things to make art and the reflectors catch the light really nicely.


There are also several ginkgo trees on the walk between the light rail station and the thrift store.  Ginkgo leaves are one of my favorite shades of green and the yellow they turn in autumn is just as pretty. They also satisfy my nerdiness because they're really interesting trees. NERD ALERT! The ginkgo is classified in it's own taxonomic classification and is basically a living fossil as it is closely related to species from 200 million years ago. It's thought that wild growing ginkgo trees died out and the tree was saved and continued only by human cultivation. It's nice when humans save something instead of killing it. Also, the Chinese name basically means "tree with the leaves like a duck foot". How awesome is that?

Tuesday, September 13, 2011

Daddy, Why Did You Eat My Fries?

Making Adventure Time plush for other people was super fun (see PB and Lady here and Finn and Jake here). But you know what was even more fun? Making a Marceline for me to keep!


As much as I sew, I rarely get to make things for myself.  Most of what I make is custom orders or for sale at conventions or on my Etsy shop. (Speaking of conventions, I'll be at NC Comicon in November, come see me!) I love sewing for other people and it's a good thing I don't keep everything I make because I would be buried in dolls, but I've been so busy lately and now I'm gearing up for a plush-a-thon in preparation for NC Comicon and the holidays. With all that, I decided to recharge  a littly by making something just for myself.


I used the same pattern I drafted for Princess Bubblegum to make Marceline, as well as modifying the dress pattern. I'm really happy with how the jointed necks are working out, so I may be making more characters in this size eventually. Other than the neck modification, which Marceline especially needed to show off her bites, the body is pretty similiar to the body I use for the regular female plush. She stands about 25" tall, most of the height coming from her legs.
I made the clothing removable so I can make her more outfits in the future. One of the little things I like about Adventure Time is that they do bother to make different outfits for the characters. (Finn, being a 13 year old boy, probably does just wear the same clothes all the time.) Her outfit from Henchmen is top of the list if I can find the right fabric for her tights.


She's very cuddly for a vampire queen, but don't tell anybody.

Saturday, September 10, 2011

Nifty Thrifty: Attack of the Thrift People

I've gushed about thrifted textiles before and how wonderful they are if you sew as a source of plentiful and super cheap fabric. Where else can you get five or six yards of lovely fabric for just a few dollars? Thrifted sheets are especially radical if you like full skirts, which I do, because they're large enough that you don't have to do a lot of annoying piecing. Added bonus: they're already hemmed, which means less hemming for you. This is awesome beause hemming sucks. Case in point:


I made this full wrap skirt with contrasting tie waist in about an hour. Don't let anyone tell you it doesn't pay off to be cheap and lazy.

Do you want to make your own? You'll need:
A sheet
Coordinating cotton (about 3/8 of a yard for 45" wide fabric)
Matching thread
Optional: Tape measure


If you have a wrap skirt you like already, you can just use that as a pattern. If not,  all you need to make your own pattern is a tape measure and a little math. (Just a little, I promise.) A wrap skirt is basically just a modified circle skirt, so you only need two measurements: around your waist where you want the skirt to sit and the length you want the skirt. Multiply your waist measurement by 1.5 to accomodate the overlap, because  flashing people on windy days is bad. You'll then half that measurement since your fabric will be folded in half.
For example, if you have a 32" waist:
 32 x 1.5 = 48
48 / 2 = 24
So if you have a 32 inch waist, the top curve of your pattern should be at least 24" long. The shape we're working with is a fourth of a circle, so multiply this measurement by 4 to get the entire circumfrence of the circle.
24 x 4 = 96
Divide this number by 6.28 to find the radius of your cirlce. (You can also use this handy calculator.) Since you have a good amount of overlap, you can round the measurement to the nearest whole number to make measuring easier. We'll  call this final measurement "W".
96 / 6.28 = about 15"
Determine the length you want the skirt and add 1" for your hem. We'll call this measurement "L".

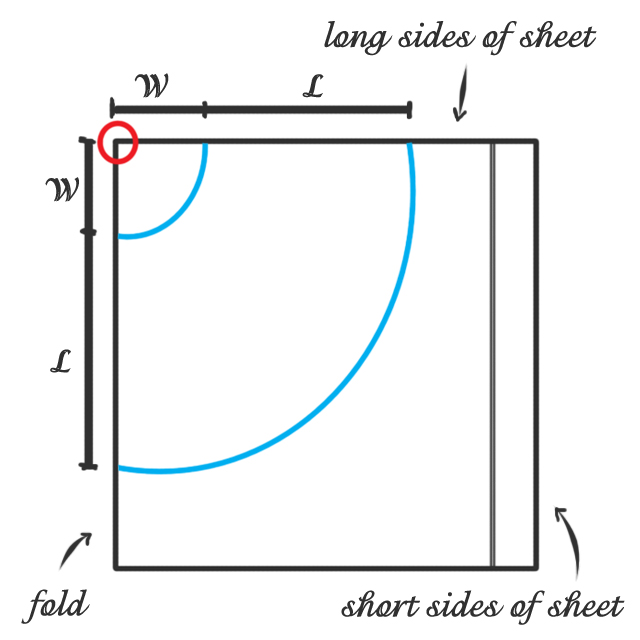
Now we're done with math! Fold your sheet in half long ways, so the top and the bottom meet. Your measurements are going to be made from the top corner of the folded edge (see the red circle in the diagram below). From this corner, measure out "W" and then "L" along both sides. Also measure "W" and "L" from this corner along several points in the middle part of the fabric, and connect to draw the top and bottom of the skirt. Pin and cut through both layers of fabric.


You'll also need to two 5" wide strips of coordinating 45" cotton fabric. The easiest way to do this is to just snip into the selvage (the woven edge on the fabric) and then tear along the length of the fabric. Then measure down 5", make another snip, and tear. Less time cutting and you get nice, straight pieces. Sew the pieces together along one short edge, so you have a piece measuring about 90" x 5". (The strip needs to be long enough to wrap around your waist twice and tie. If two pieces isn't long enough, just attach an additional strip.)


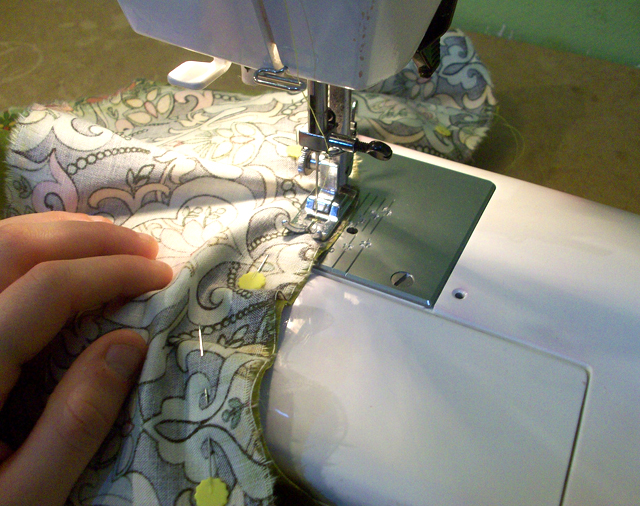
Line up the center of your waistband and the center of the skirt with good sides facing. Pin and sew the waistband to the top edge of the skirt. (The straight sides should already have the sheet's exisisting hem, so no need to bother hemming them.) The waistband will be longer than the top of the skirt; this extra fabric will become the ties.


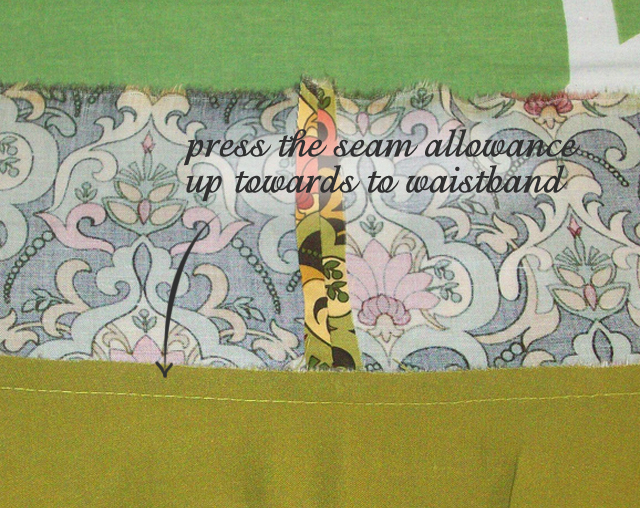
Iron the waistband flat, pressing the seam allowance to the waistband side.


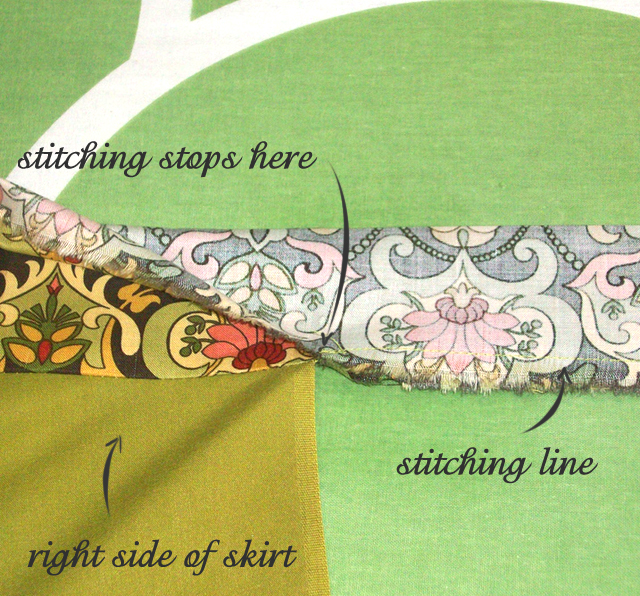
Fold the waistband in half good sides together. Sew along the open edges with a 1/2" seam allowance. Stop at the edge of the skirt.

I chose to make the ends of my ties into a point, but you can do whatever shape you like. Just be sure to cut away any excess fabric.


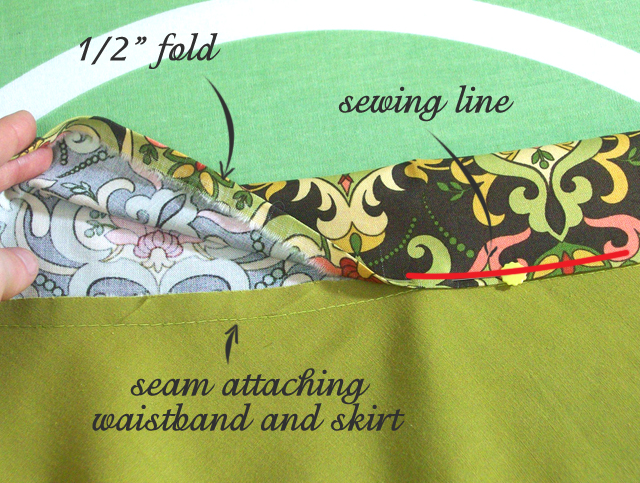
Turn right side out and press. You should have a raw, unstictched edge where the waistband is attached to the skirt along only one side. Press this edge under 1/2". Fold the edge over with the wrong sides of the waistband facing. Line the folded edge up with your waistband seam. Pin in place and topstitch close to edge.

Now just press and stitch a double 1/2" hem along the bottom and you're done!

If there are any questions, I'm happy to help. I'd also to love to see any skirts that are made using this tutorial. If you'd like to share a picture of your skirt you can link in the comments below or email me at kittyzilla@handmadestuffs.com.

Friday, September 9, 2011

Totally Mathmatical!

Plush Finn and Jake can't just go galavanting about the land of Ooo all alone, right?


Duh, they have to have PB and Lady Rainicorn to rescue from the Ice King and his terrible fanfiction and explain the difference between Xanoids and Plantoids. Ya ding dong.


Since PB is a princess, she has to rock out in her sweet crown.


She also has two little dresses, in case she wants to mix it up a little.


When she has important royal business to attend to, so can ride off on Lady Rainicorn. Who is huge. I'm serious, check this out.


I think she ended up being a little over 60" long. I really didn't intend to make her that hugely long and it took forever to sew all those strips of fleece together. Despite that, I totally want to make another one. Princess Bubblegum is about 25" tall, so a little taller than the plush Finn. She's the first plush I've done with an actual neck that's jointed, and it turned out pretty well.

So far, these have been customs and I'm only able to enjoy them for a short time. These were so fun to make I need to make some for myself. I think I'm going to have to carve out the time to make myself a plush Marceline the Vampire Queen. Is there a cuter idea than a little plush axe bass?

Wednesday, September 7, 2011

Nifty Thrifty: Creature from the Thrift Dimension

I have a Nifty Thrifty post with a tutorial (oh so snazzy) planned for this weekend. In the meantime, have this mug. When you think of beautiful rainbows, don't you think of ... Detroit?

Thursday, September 1, 2011

Good News, Everyone!

Now is the time to do the Almost Through My Commissions Dance. As much as I totally love making customs and all the amazing and weird character requests I get, I haven't had a chance to make what I want to make in MONTHS. I'll be taking a break from customs until early November to prepare for selling at NC Comicon and to get my Etsy shop stocked for the holidays! Keep an eye out for lots of new characters, some old favorites, and other fun things.

Until then, bask in the amazingness that is Futurama plush.


Bender, as was to be expected, was a pain in the BUTT! I think I went through five versions before I was happy with how he looked. Version four was great except for being about 3" too tall, which I didn't realize until I was most of the way done and set him down next to Fry. Argh.


I am so pleased with how little Zoidberg turned out, especially the little sandals and face tentacles. Who knew face tentacles could be so cute? Making him used up the last of this peachy colored fleece though, so I'm on the hunt for more.


Of course you can't have Futurama without little Fry. I love his ridiculous hair. Now I'm going to go try not to think of the episode with Fry's doggie Seymour and .... oh crap now I have to go cry. (The end of the Wikipedia article has links to articles about real dogs who for years for their dead masters. Wikipedia what did I ever do to you?)